Sunday, April 8, 2012

PIZZA!

So I kind of just realized that it has been almost a full year since I have posted anything. It's incredible how much life gets in the way sometimes. So what have I been up to? Well, for starters, I've graduated college and started a "big boy" job at a really awesome company. My mom, who was the reason I started this blog, has officially moved to Texas and I have moved into my dad's house for the time being.

So I guess at this point my posting will no longer be about the things that I've always wanted to learn from my mom. Sadly, they will from now on be about figuring things out on my own, and most likely making some mistakes along the way. I am, however, still armed with my family cookbook. I was fortunate enough to steal one of these when they were being made and now can try all of my families recipes whenever i'd like. And to be fair, questions are always just a phone call away.

So this brings me to today's post - pizza. Something I have always taken for granted as a simple phone call and pickup in 20 minutes kind of thing. I'm not sure if it's a Buffalo thing or an everywhere thing, but we love our pizza. Friends getting together to watch the game? Pizza and wings. Birthday? Pizza and wings - you catch my drift. I had never really made pizza until I went to visit my sister in Richmond last year, and I was turned into a homemade pizza fanatic. I mean, look at the facts: you can put as many toppings or as few, as much cheese, make the crust as thick as you want, anything! Now she makes her pizza dough from scratch and her sauce from scratch so I am going to do the same here. The key to this really is the sauce. The house smells awesome when it's cooking and it all just tastes really fresh.

STEP 1: The Dough

So dough to me was always a pretty intimidating thing. I always felt I could never get it right, but I was always wishing I could figure out how to toss it up in the air to flatten in out. Turns out that making the dough is really simple. The tossing of it up in the air? Not so easy. Either way, here's what you'll need for the dough:


  • 3 cups flour (1/2 all purpose flour, ½ bread flour)
  • 2 teaspoon salt
  • 1 ½  teaspoon active dry yeast
  • 1 cup lukewarm water (may need up to 1 or 2 tablespoons more)
  • 2 tablespoon olive oil
  • 1 tsp sugar
First step is to get your one cup of water between 105 and 110 degrees. I use a digital thermometer to check. After it's the right temperature, add in the sugar and dissolve it. After it's dissolved, add in the yeast.


The whole mixture should foam up a bit - that's a good sign that the yeast is working properly. While the yeast is working - get a mixing bowl out. In there put in the flour and sugar and stir it up a bit. Then, add in the oil, and then after the yeast-water mixture has sat for about 5 minutes, add that in too. Stir it up so it all somewhat comes together. If you are mixing with the spoon and notice a lot of loose flour on the bottom, then add in a tablespoon or so of water until all the loose flour gets absorbed. Once all of it is somewhat together, dump it out on a lightly floured counter and knead it. This is what it should look like before you knead:


 After it has a nice dough consistency, put it back in the bowl and lightly coat it in olive oil. Place a towel over it and place it in a warm place to rise for about two hours.


PART 2: Pizza Sauce

The awesome part about this step is that it is just so easy. Here's all you'll need.


  • 4 cloves garlic
  • Salt and pepper 
  • 2 tbsp olive oil 
  • Pint of tomatoes 
  • Fresh Basil
  • Can of tomato paste
Start off by peeling and finely chopping the garlic. Add that into a saucepan with with the olive oil and turn on the heat. Once this gets cooking pretty good, add in the pint of tomatoes. I used a can from grandmas farm, but alternatively you can get fresh tomatoes and blanch them briefly to remove the skins and then toss them in. After I added the tomatoes I smashed them up just a little bit. I let this simmer as is for a good half hour. 


 After I've let it simmer for a while, I add in the can of tomato paste to thicken it up and let it simmer for about another 15 minutes. Once it has become a nice consistency, I add in freshly copped basil (a good handful) and stir that in. Let it simmer for about another 10 minutes and then you're done with the sauce! 

STEP 3: Assemble the Pizza

Now is where you begin to put your pizza together. Before you do anything you should turn your oven on to about 450 and put your pizza stone in the oven. It really is important that you use a pizza stone. A pan or anything else wont be able to cook the crust evenly before the cheese and everything burns, so it needs to sit on the super hot stone. If you don't own one, stop what you're doing and go buy one. Now that your oven is pre-heating, take the ball of dough that you made and cut it in half. Take one half and set it down on a lightly floured counter. Pat it into a circle and then begin rolling with a rolling pin. You want to make the crust as thin as possible. It may require cutting a little excess away at the end, but figure out what works for you to end up with a good sized circle. Take some olive oil and just lightly coat the crust. 


Clearly you can see it won't always be a perfect circle, and that's ok. At this point, the rest is pretty self explanatory. Lay down as much sauce as you'd like (one thing to point out, go pretty close to the edge of the pizza with the sauce and toppings) and then cheese and toppings. On this one I used fresh mozzarella and pepperoni. Fresh mozzarella with the fresh basil sauce has to be one of the greatest things ever.  

Now, this is where a pizza paddle seriously comes in handy. Oh I didn't tell you to buy one of those back when you got the stone? My bad, go get one now. As you can see from the picture above my ready to cook pizza is on the pizza paddle with parchment paper in between. The parchment paper is key to making sure the dough doesn't stick to the stone. I've been told that once you use your stone a lot and "season it" that you will no longer have to use parchment paper, but for now I do. Just slide in the pizza and set it on the stone. Let it bake for about 10 minutes and check on it - it should pretty much be done. When the cheese is just how you want it, pull it out using your paddle and slide it right on to a cutting board where you can cut, and enjoy.

I'm not sure what's going to be up next, but now that i'm living aline I feel like there will be a lot more time to try out some new recipes. I need to find the right occasion for it but I really need to try raspberry creme cake. Sounds good right about now after the pizza...

Monday, April 11, 2011

Cream Puffs - good for the soul, not for the waist

 I really do still cook. Between trying to graduate college, and lose some weight for the summer, cooking up family recipes that include phrases like "a stick of butter" and "a cup of sugar" have not been on my list of foods to eat. However, time is surely running out before my mother leaves and I have a LOT of recipes I still need to learn, so it's all in the name of homestyle preservation right?

This next one I'm tackling is probably a family favorite. One of those dishes that never leaves leftovers, and more so, always leaves a smile on the faces of the lucky few that happened to be around the table when these come out of the fridge. Yes, cream puffs. I would really like to go into an awesome rant right here about how there is some deep seeded family history as to why these are so special, but as far as I know there isn't. Where most recipes I talk about have some tie to my grandparents farm, or ties to events shared with family, these don't have any distinct place. They are just that special to me because they really are just THAT good.


I know what you're all thinking, and yes, I will tell you how to make them! Basically, it breaks down into two parts, the actual puff and then the filling. I'll jump around just a little bit, but for making these you kind of have to. So here goes:

The filling (Part 1 of 2)

1/2 cup sugar
3 Tbsp Corn Starch
2 Tbsp Flour
1/2 tsp salt
2 egg yolks
2 cups milk

Beat egg yolks, and add the two cups of milk in a small bowl.  In a saucepan, mix all of the dry ingredients. Add the milk/egg mixture and turn the heat on. You need to stir constantly through this whole process. In the beginning it will look like this:


Keep stirring, and eventually it will all of a sudden thicken up. Seriously, you need to be stirring and watching, because it will happen pretty rapidly. When it does, remove from heat, and place in the fridge. As an FYI, heres what the thickened part looks like:


After that is in the fridge, we can move on to step two, so here goes..

The Puffs (Step 1 of 1)

First off, preheat the oven to 400. I'm not sure why, but I always seem to forget to preheat the oven. You'd think after the first couple times I had to impatiently wait with a pan full of cookie dough I'd learn, but I guess not. Anyways, while the oven is preheating, we will make the dough that will make the puffs. Ingredients are:

1 cup Water
1/2 cup (1 stick) butter
1 Cup all purpose flour (King Arthur flour really does make a difference, I'll explain another day)
4 eggs

Heat the water and butter in a saucepan until it reaches a rolling boil. When it does, add in the flour and stir vigorously for one minute over low heat, or until the dough forms a ball. Remove from heat, and beat in the four eggs (you can do this right in the saucepan, but make sure you don't use a non stick saucepan).


At this point, your dough is ready to go. Using a tablespoon form the dough into small balls and drop them onto a baking sheet lined with parchment paper.


Pop these in the oven (you should have ended up with about 25 dough balls) for about 30-32 minutes, or until they are nice and golden brown.  They look pretty good coming out of the oven.


This brings me to part 3!

The filling (part 2 of 2)

At this point the filling you made earlier should be nice and chilled down, but it's not quite ready to get piped into the puffs you just made. In a separate container, whip 3/4 cup of heavy cream until it is thick. Warning: When working with heavy cream, make sure the bowl and mixer are TOTALLY DRY. After it has whipped up into the consistency of whipped cream, add it to the chilled bowl of filling, along with 1 tsp of vanilla, and beat until well blended. Your chilled custard is now delicious cream puff filling!


Scoop this custard into a pastry bag, and use a tip that will not make a giant hole in the cream puff. I found the trick to filling these was to find an already weak point near the top of the puff, insert the tip and squeeze in enough filling so that the top of the cream puff starts to bulge just a little bit, or when the filling backs up to the tip.  The reason you want to pipe it in near the top, is because later on you will cover the top with chocolate frosting, which will hide your filling point.  Continue to fill all of them, and you should have just enough filling to fill them all up.


After that, just whip up some simple chocolate frosting and lightly frost all of the cream puffs. An alternative is to just sprinkle confectioner's sugar over them but i'll be honest, the chocolate frosting is way better! After they're all nice and frosted, pop them in the fridge for about two hours and they are ready to serve!


With Easter just around the corner, I will have a TON to blog about, so keep checking back!

Saturday, January 29, 2011

Wigilia Dinner..Did I mention I'm Polish?

A long standing tradition in my family has been to gather at my Grandma's house on Christmas Eve, where all of my Aunts, Uncles and Cousins would eat a large dinner, and then exchange presents. As I recall, when I was a kid, dinner was merely just a painfully long process that was necessary before the presents could be opened. I remember I was always SO excited about opening the first presents of Christmas. But alas, presents at my age are usually very practical, and generally not too much of a surprise. I'm certainly not complaining here at all; I still love getting presents and I love the joy everybody gets when opening my present I gave to them. If anything has changed, it's what I look forward to every Christmas eve. What used to be a long drawn out process standing in the way of me tackling as many presents that had my name on it is now truly what I look forward to the most.

So what's so great about this dinner, you ask? Well, It always consisted of fried fish, homemade pierogi, lots of potatoes, kapusta (sweet and sour cabbage), creamed cucumbers, corn and any other number of veggies. By itself, this sounds pretty awesome, but it's the tradition behind the dinner that is even cooler to me. This traditional Polish dinner is called Wigilia (pronounced vi gilia). Wigilia by tradition begins when the first star is spotted in the night sky, which is supposedly around 5pm. While champagne has already been flowing for a while at this point, this is where the food begins. As a tradition, everybody gets a piece of a Christmas wafer, which they then go around to everybody in the house, break a piece off to them while wishing them good fortune in the new year. Then, while dinner preparations are being finished, cheese & crackers along with shrimp, crab cakes and other things are served. I assume this may be to soak up some of the champagne most of us have already consumed. As far as the dinner table goes, an extra spot was always set at the table to symbolize Jesus being present at the table.  Along with this hay would be placed under the plate.  As I read about this Polish tradition, a variant is for a plate to be set just in case an unexpected visitor or family member arrived.

For the last few years, I have been in charge of cooking the fish, probably because I'd done just that on Friday nights in a local restaurant for about 2 years. So if you always wanted to make a homemade fish fry at your house, pay attention here.

First off, pour oil into your home deep fryer up to the proper level (go closer to the max fill line) and set the fryer for 350 degrees. Next, you'll need to make the batter for the fish.  Batter in itself is simple to make, but the consistency is key. If the batter is too thin, it wont stick to the fish.  If it is too thick, it will stick to the fish, but also stick to everything else, including the basket and other pieces of fish. The consistency should be a little thicker than milk.  Best thing to do here is follow the instructions on the package. If it's too thin after you cook your first piece, add more mix. Too thick, pour a little beer out of your drink to thin it out. Golden Dipt makes a pretty good batter mix, and can be found at any supermarket.

Next, you'll need your fish.  Don't go cheap on this one. A good piece of fish will cook and taste so much better. I recommend Cod or Haddock. We always get our fish from Clark's in hamburg, and have yet to have an issue with them, they're awesome!

You'll also need a bowl of flour, tongs and a metal spatula. Start off by taking a piece of fish and placing it in the bowl of flour. Coat the piece pretty well in the flour.
    After it is coated in the flour, toss it into the batter. Make sure it gets a nice coating, and then pick the piece of fish out of the batter with a pair of tongs.
Now it's time to drop the fish into they fryer. But unless you want a lot of burns, don't actually drop it. The key to making sure not to burn yourself as well as making sure the fish doesn't stick to anything is putting into the oil slowly. After all the excess batter runs off the fish, place it into the oil, but move the tongs back and forth a little before letting go of the fish. If the batter can set on the outside before it touches the bottom, it won't stick as bad.
Let the fish cook for a few minutes on each side, generally until they are a nice golden brown color all around. It tasted just as good as it looks. Did I mention yet that I have to give credit for these pictures to my sister Jill? Seriously, she takes awesome pictures. And shes also the inspiration behind starting this blog in the first place. You should check out her blog (after you finish reading of course).

After you take the fish out of the oil, let any excess drain out for a few minutes. After that, it's ready to serve. Cooking the fish is my small contribution to this amazing Wigilia tradition, and hopefully you can see why this amazing dinner with family is the best present of all.


The desserts are also one of the best parts. I mean seriously, who doesn't love dessert? For some reason, the fruit slices are a family favorite. I guess it's a comfort food that brings you back to Christmas in the 90's. They have just always been there. It's tough though, between all the options, you really can't have it all. Apple pie this year? I'll have to try the raspberry next year.
 No, not homemade


 Also, not homemade. Must give many thanks to one of my mothers colleagues for always sending one for our Christmas Eve dinner. It's turned into part of the tradition by now.

Next year, many photos of all the pies will be included. I may also post my starting and ending weight for this day. On second thought, that might not be the best idea..

Friday, January 28, 2011

Gramma's Noodles

Chicken Soup has always been one of the staples of my family.  I suppose every family has their own version of the worlds greatest chicken soup, but seriously, the one I grew up on is the best. Along with the soup (which I promise I will make a post all on its own, it's on the list) the home made noodles were always the best part.  I still remember my Grandma putting the noodles in everybody's bowl before dishing up the soup and she was lucky if anybody had any of them left in the short time it took for her to grab the kettle.

However, like a lot of food that is nostalgic to my childhood, its not just the taste or the smell that makes them so great. It's making them that made these noodles so special.  Getting your 8 year old hands full of flour and "fluffing" uncooked noodles on Grandmas stainless steel work counter is something I'll never forget. Did i mention raw noodles taste even better than the cooked ones?

So who said to make something great it needs to have a ton of ingredients? This is far more about the process than whats in it.  Either way, here is what you'll need:

3 cups flour
3 eggs + 1 more egg yolk (discard the white)
1/3 cup water (approx)
A pot of boiling water, with approx 1 tsp of salt added

Yep, that really is all there is to it. To start off, put the flour and eggs into a bowl.


Take a fork and start to stir/mix the eggs and flour together. You'll have to work it for a little while, but eventually you should be able to get it to look something like this:

Now is the toughest part of the whole process, and frankly one that my Grandma always took care of. Add about 1/4 cup of water to this mixture and stir it in. After you do that, it should start to form somewhat into dough. As you stir the dough will naturally start to form into a ball.  However, there will be bits of egg/flour mixture that will still be at the bottom of the bowl not getting absorbed by the ball. add water just a little bit at a time to those areas so it gets absorbed into the rest of the dough.  It doesn't have to all get to that point, just most of it.  It's very important not to use too much water here. When you think you have it pretty close, dump it all out onto a very lightly floured cutting board. It will look like this: 
As you can see, its not all together at this point.  Not to worry though, it will all come together when you start to knead the dough.  Tip: use the heel of your hands to press into the dough, turn the ball 90 degrees and repeat.  Keep working it until it is a very even consistency, then roll it into a log. It should look like this after a lot of kneading. 
Tip: if you're hands are really sticking to the dough during the kneading process, use a little flour. But just like the water, use it very sparingly. After you have a nice looking log of dough just like the one above you'll want to cut it into about 2 inch pieces. The purpose of this is to turn the dough into manageable sized pieces. Make sure you have a VERY sharp knife for this process (and the rest of the process). Heres what it should look like at this point: 
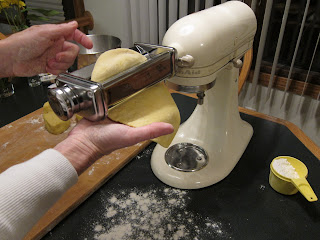
When I was a little kid, this is where I came in.  To make noodles you need to now press the dough into very thin sheets.  This can be done with either a hand crank press or if you have a Kitchen Aid Mixer, you can just purchase this attachment. Luckily, my mom has the Kitchen Aid and the attachment so I got to use that. Actually, I have to give my mom a lot of credit for this post, she did all of the cutting, as you will see. 

Rub some flour on a piece of the dough and feed it through the press on #1.
After you run it through on #1, re-flour the piece of dough (again, lightly) and then run it through the press on #2. After that, you don't need to flour it anymore as you run it through #3, #4 and #5 on the press.  After you run it through on #5, you should have a nice long thin piece of dough. 
Re-flour the cutting board and place the long sheet of dough on it. Cut the sheet in half, then cut the two resulting pieces again the long way so you have 4 workable pieces of dough.  Stack these sheets on top of each other, but generously flour in between the layers. If you don't, the dough will stick together as you try to cut it. Place your left hand on the sheets of dough as you cut thin strips with the knife. Make sure not to push down with your hand, but more or less just use it as a guide. 
 This is where the most fun begins for an 8 year old (or a 21 year old that still loves this stuff). Take the cut pieces of noodles, pick them up and just "fluff" them a little bit. This is to make sure nothing is sticking together. After you fluff the noodles, you can put them into a bowl.  If you don't get what I mean by fluffing the noodles, they'll end up looking like this:
 Now, after you get all the noodles cut, fluffed and placed into the bowl, hurry up and get them into the pot of boiling water you prepared. Why? because if you don't, they may never make it.  As I said before, these taste so good, which makes no sense looking at the ingredients. I remember as a kid Grandma saying "If you keep eating those your stomach will stick together!" Looking back now, I imagine this was just a clever deterrent from me eating the whole bowl. 
 Sprinkle the noodles in a handful at a time, stirring constantly so nothing sticks together.  Cook for about 8-10 minutes, or until tender.  Pour them out into a colander and rinse.  After they have been well drained place them in a bag and refrigerate, or dump them right into a nice warm bowl of home made chicken soup. If you ever run into the issue of running out of soup before you run out of noodles, put them in a pan with some butter, salt and pepper and cook for a few minutes. No matter how you eat these, whether it be raw, just rinsed, in soup or buttered, you'll never buy store bought noodles again. 


Sunday, January 23, 2011

Hot Chili for a "chilly" day

As I begin my first post, I feel I must point out that the current temperature in Buffalo is 4 degrees. And yes, that is without the wind chill. What a perfect day for soup, hot chocolate, or even better, a nice warm bowl of Chili.

Ever since I was a little kid this was always a favorite of my mom's to make when we went out for a day of skiing. Now that I've made it, I can see why.  While it's pretty easy to make, it only gets better the longer you simmer it. Throw it into a crock pot while you're out on the slopes for a few hours in the freezing cold and all of a sudden Chili really starts to sound good.

So what are you going to need? The list of ingredients is short and sweet. (well not literally sweet of course)


  • About 12 medium sized tomatoes (core them, peel them, and then cut them in half)
  • 2lbs Ground Beef (I used 92% lean, but I'm sure 90% or 85% would be just as good)
  • 1 lg onion
  • 1 green pepper
  • 1 tsp salt
  • 1 tsp pepper
  • 1 tbsp chili powder
  • 1-2 cans of Bush's Chili Beans (depending on how much of a bean lover you are, or if you share a bed with somebody) 
  • 1 can Campbell's Tomato Soup  

To start off, peel and core the tomatoes, cut them in half and put them in a medium sized kettle. I'll admit, with the cold temps and lack of good tomatoes right now in Buffalo, I used whole frozen tomatoes from the freezer that came off of grandma's farm this past summer.  As a result, I didn't snap a picture of them.  When I make this again I promise I'll edit this post with nice ripe summer tomatoes. Anyways, turn the kettle on to simmer and occasionally stir them up. Eventually, they will boil down and no longer really look too much like tomatoes. I was like a kid at a magic show when they really did turn from their tomato shape into a liquid. I still say its magic. Next up, you'll want to food process the pepper and onion. If you don't have a food processor, you can spend some time chopping and you'll get the same results. I was lucky enough to have a food processor, as you can see: 


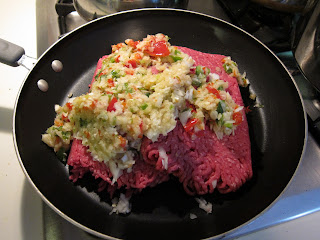
Next, you put the beef, food processed pepper and onion, salt, pepper and chili powder all in a frying pan. Turn it on to medium-high heat to get it all going. Everything going in to the pan should look a lot like this..


After the meat has been browned, turn the heat down to simmer. At this point, the juice from the meat and veggies will allow you to cook this without burning the beef. Let all of that simmer in the pan for about 20-30 min, or whenever the tomatoes have pretty much boiled down in the kettle. You'll want to let it simmer, because at this point the kitchen will smell fantastic.


After you've let it simmer enough, its time to add the beef mixture to the kettle.  Stir it in and make sure to get every last bit in.  At this point make sure the kettle is still on simmer, and just relax.


In about 90 minutes the chili will be thick enough to go on to the next step, but there is nothing wrong with letting it simmer for 2 to even 3 hours. When it appears to be around the right consistency of chili, you'll want to add the last of the ingredients. 


I'm told by my mother that the can of tomato soup is a super secret family recipe. While i'm not too sure about this, it does taste pretty good. After you add in the beans and tomato soup, let the chili simmer for about 15 more minutes, and it's ready to serve. If you're anything like me, Cheddar cheese and saltine crackers are must to go along with this.


As also mentioned earlier, this goes fantastic in a crock pot, and even better on a cold Buffalo winter day.